I needed an idea for a humorous b-day card and came across the funny saying "Did you just hoot?". I just recently purchased the Whimsical Bird stamp set and it has some adorable owl stamps that I was eager to use on a card! I decided to make a T-Slide card, so when you pull on the tab on the right it opens up to reveal the saying underneath, which I put "Hoot all you want, it's your birthday". I think it turned out sooooo cute. :) If you would like to make a T-Slide card, here is a link that will take you to a tutorial: T-Slide Card. If you make one, be sure to leave a comment below with a link or picture. I would love to see it!
I also needed a humorous masculine birthday card, clean ones are hard to come by these days, so this is what I came up with. It is a simple computer generated and paper pieced card, but I think it is perfect for the person we are giving it to.
All new posts will now be at: www.dippitydot.blogspot.com I hope that you will continue to follow my blog at the new address! :)
Background
Jun 9, 2011
Jun 6, 2011
Altered Distress Frame
On top of making projects magnetic, I love to alter & beautify plain & drab items! Here is an inexpensive photo frame I picked up and altered. I used the Tim Holtz Distress Crackle Paint and distress ink on the frame. This was the fist time to use the Crackle Paint and I love the distress look! The paper is from The Angel Company and the verse used is computer generated. I used my Cricut to cut out the chipboard bird, birdcage, and swirls. The two windows on the right side of the frame are of course, magnetic, making it easy to add & change pictures if desired. The bird and button in those windows I made into magnets, so they can be used or removed easily as well. I had a lot of fun with this project, so I am sure I will be making more. If you would like to purchase this frame or would like me to customize one for you be sure to drop me an e-mail at: judesigns@hotmail.com. You can also visit my Zibbet store at: Dippity Dot Creations to see what other items I have for sale.
Jun 3, 2011
Cards, cards, and more cards!
June is a very busy month for my family with lots of birthdays, anniversaries, and Father's Day. I have been working on designing and making several different cards so I thought I would share some of them with you. If you are looking for a fun, unique, or personalized card just e-mail me at: judesigns@hotmail.com. I would love to design one to fit your needs. My cards range from $2-$4, depending on the number of layers and embellishments used.
Father's Day cards:
On these Father's Day cards I used a variety of different techniques. The sentiments are computer generated, I distressed and inked the edges, used my Cricut machine to cut out the "dad" letters, used my scoring board to create the dry embossed lines, felt was used to create the mustache, and for the compass embellishment I used used copper Stickles and Glossy Accent over a compass design I stamped on cardstock.
Kid's B-day cards:
These are pop-up cards. The photo below shows what it looks like when it is closed. They fit right inside of a card envelope, so they can be easily mailed. These cards are a lot of fun to make. On the cupcake cards I used the adorable "Cupcakes" stamp set from Maya Road and paper pieced them using some cute paper from the Paper Studio "Poteeka Souffle" pack. The number "6" and names were cut out using my Cricut.
I saw this cute idea and I just had to make it for my nephew, since his b-day theme was trains. I found a photo of Thomas on the internet and printed off his face. The rest of the card is paper pieced together and I cut out the circles and the number "2" using my Cricut.
Fun buckle cards:
These cards close with a fun paper buckle with a sentiment stamped on them.
Easel Card:
Here is another fun card to make, the Easel Card. This also lays flat so it can easily be put into an envelope and mailed. The stamp set used is from The Angel Company.
Father's Day cards:
On these Father's Day cards I used a variety of different techniques. The sentiments are computer generated, I distressed and inked the edges, used my Cricut machine to cut out the "dad" letters, used my scoring board to create the dry embossed lines, felt was used to create the mustache, and for the compass embellishment I used used copper Stickles and Glossy Accent over a compass design I stamped on cardstock.
Kid's B-day cards:
These are pop-up cards. The photo below shows what it looks like when it is closed. They fit right inside of a card envelope, so they can be easily mailed. These cards are a lot of fun to make. On the cupcake cards I used the adorable "Cupcakes" stamp set from Maya Road and paper pieced them using some cute paper from the Paper Studio "Poteeka Souffle" pack. The number "6" and names were cut out using my Cricut.
I saw this cute idea and I just had to make it for my nephew, since his b-day theme was trains. I found a photo of Thomas on the internet and printed off his face. The rest of the card is paper pieced together and I cut out the circles and the number "2" using my Cricut.
Fun buckle cards:
These cards close with a fun paper buckle with a sentiment stamped on them.
Easel Card:
Here is another fun card to make, the Easel Card. This also lays flat so it can easily be put into an envelope and mailed. The stamp set used is from The Angel Company.
Jun 2, 2011
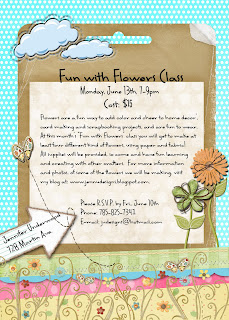
Fun with Flowers Class - June 13th
This month's class is all about flowers. I will be showing you how to create and make different types of flowers out of paper and fabric to use on all different types of projects. The cost is only $15 and all supplies will be provided. Below is an invitation with more details as well as some photos of some of the flowers we will be creating. Hope you can join us!
Here are some photos of flowers that we will be creating:
Subscribe to:
Posts (Atom)